공식문서를 번역한 내용입니다
https://fastapi.tiangolo.com/ko/tutorial/schema-extra-example/
Declare Request Example Data - FastAPI
FastAPI framework, high performance, easy to learn, fast to code, ready for production
fastapi.tiangolo.com
에플리케이션이 전달 받을 수 있는 데이터 예시를 선언할 수 있다.
Pydantic schema_extra
Pydantic 공식 문서 : 스키마 커스텀에 설명되어 있는 Config와 schema_extra를 사용해서 example을 선언할 수 있다.
from fastapi import FastAPI
from pydantic import BaseModel

app = FastAPI()

class Item(BaseModel):
    name: str
    description: str | None = None
    price: float
    tax: float | None = None

    class Config:
        schema_extra = {
            "example": {
                "name": "Foo",
                "description": "A very nice Item",
                "price": 35.4,
                "tax": 3.2,
            }
        }

@app.put("/items/{item_id}")
async def update_item(item_id: int, item: Item):
    results = {"item_id": item_id, "item": item}
    return results
추가 정보는 해당 모델의 JSON 스키마 결과로 그대로 추가되며, API문서에 사용됨.
extra는 JSON Schema 형태의 값을 만들어내고 Swagger와 같은 docs에서 확인 가능함.
🍳 JSON 스키마를 확장하고 본인만의 추가 정보를 추가할 때 똑같은 방법을 사용할 수 있다.
🍳 exmaple이라는 것을 그대로 명시해야한다. 저 변수명(?)은 사용자가 임의로 조작하면 더미 데이터인지를 인지하지 못한다.
Field 추가 인자
Pydantic 모델과 함께 Field()를 사용할 때, 다른 어떤 임의적인 인자를 함수에 전달하여 JSON 스키마에 추가적인 정보를 선언할 수 있다.
각 필드에 example을 추가하여 사용할 수 있다.
from fastapi import FastAPI
from pydantic import BaseModel, Field

app = FastAPI()

class Item(BaseModel):
    name: str = Field(example="Foo")
    description: str | None = Field(default=None, example="A very nice Item")
    price: float = Field(example=35.4)
    tax: float | None = Field(default=None, example=3.2)

@app.put("/items/{item_id}")
async def update_item(item_id: int, item: Item):
    results = {"item_id": item_id, "item": item}
    return results
❗전달되는 추가 인자들은 어떤 유효성 검사도 없이, 단지 문서화의 목적만을 위한, 추가적인 정보라는 것을 명심해야 한다.
OpenAPI 속 example과 examples
- Path()
- Query()
- Header()
- Cookie()
- Body()
- Form()
- File()
을 통해서 OpenAPI에 추가되는 정보를 데이터exmaples이나 example의 그룹과 함께 선언할 수 있다고 한다.
example을 사용한 Body
아래 예시는 Body()에 예상되는 데이터의 example을 전달합니다
from fastapi import Body, FastAPI
from pydantic import BaseModel

app = FastAPI()

class Item(BaseModel):
    name: str
    description: str | None = None
    price: float
    tax: float | None = None

@app.put("/items/{item_id}")
async def update_item(
    item_id: int,
    item: Item = Body(
        example={
            "name": "Foo",
            "description": "A very nice Item",
            "price": 35.4,
            "tax": 3.2,
        },
    ),
):
    results = {"item_id": item_id, "item": item}
    return results
문서 UI 속 예시
위 방법 중 하나를 사용한 뒤 /docs에 접속해보면 아래와 같이 보인다

다중 examples를 사용한 Body
단일 example 대신, 다중 예시와 함께 dict을 사용하여 예제를 전달할 수 있다. 각 예제에는 OpenAPI에도 추가될 추가 정보가 있다.
dict의 키는 각 예시를 식별하고, 각 값이 또 다른 dict 이다
또한 추가적인 기능을 가지고 있는데,
- summary : 예시에 대한 짧은 설명
- description : Markdown 텍스트를 포함하는 긴 설명이다.
- value : dict과 같이 실제로 보여지는 예시
- externalValue : value와 달리, URL을 가리키는 예시. 하지만 value와 달리 많은 도구들에서 지원하지는 않는다.
from fastapi import Body, FastAPI
from pydantic import BaseModel

app = FastAPI()

class Item(BaseModel):
    name: str
    description: str | None = None
    price: float
    tax: float | None = None

@app.put("/items/{item_id}")
async def update_item(
    *,
    item_id: int,
    item: Item = Body(
        examples={
            "normal": {
                "summary": "A normal example",
                "description": "A **normal** item works correctly.",
                "value": {
                    "name": "Foo",
                    "description": "A very nice Item",
                    "price": 35.4,
                    "tax": 3.2,
                },
            },
            "converted": {
                "summary": "An example with converted data",
                "description": "FastAPI can convert price `strings` to actual `numbers` automatically",
                "value": {
                    "name": "Bar",
                    "price": "35.4",
                },
            },
            "invalid": {
                "summary": "Invalid data is rejected with an error",
                "value": {
                    "name": "Baz",
                    "price": "thirty five point four",
                },
            },
        },
    ),
):
    results = {"item_id": item_id, "item": item}
    return results
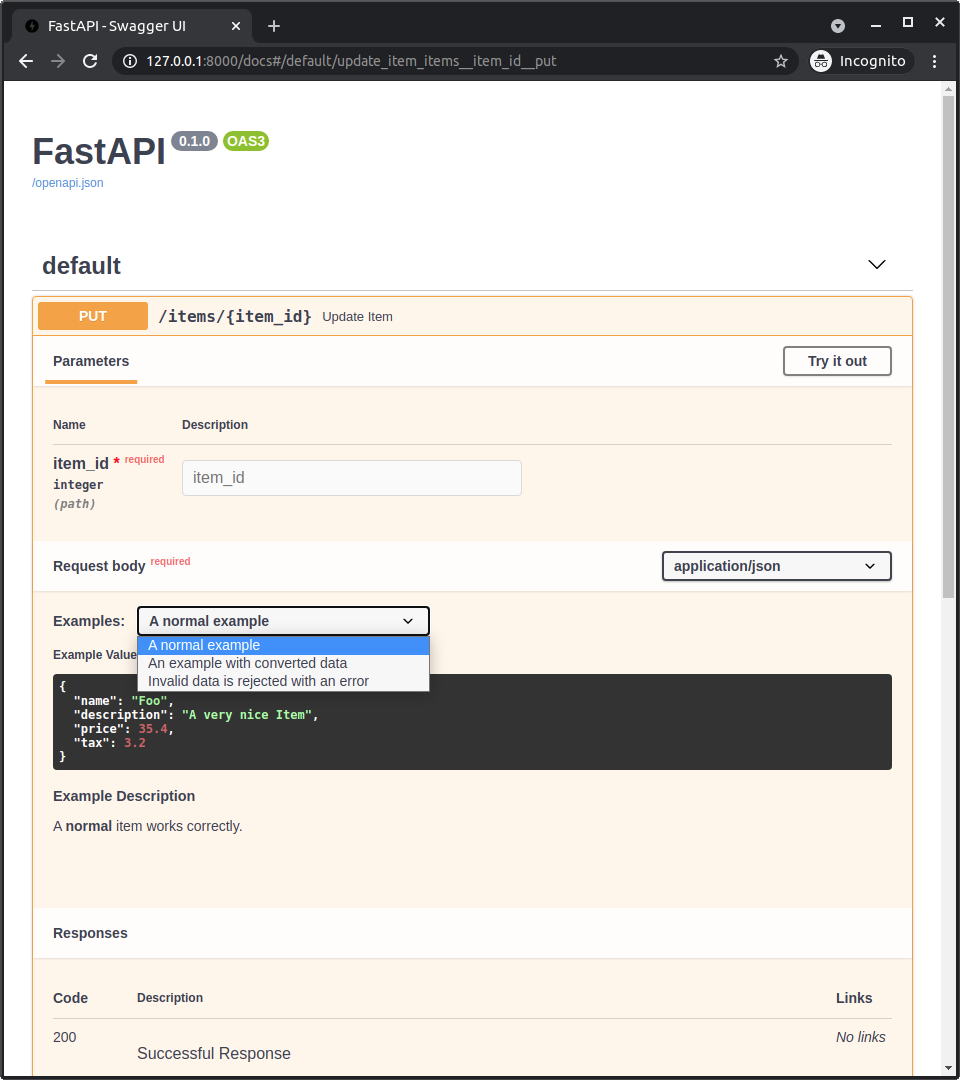
문서 UI 속 예시
Body()에 examples을 추가한 뒤 /docs에 접근해보면 아래와 같이 보인다.
'코딩 > FastAPI' 카테고리의 다른 글
| FastAPI 배우기 - Cookie Parameters (0) | 2023.07.11 |
|---|---|
| FastAPI 배우기 - Extra Data Types (0) | 2023.07.03 |
| FastAPI 배우기 - Body - Nested Models (0) | 2023.07.03 |
| FastAPI 배우기 - Body - Fields (0) | 2023.07.03 |
| FastAPI 배우기 - Body - Multiple Parameters (0) | 2023.06.27 |


